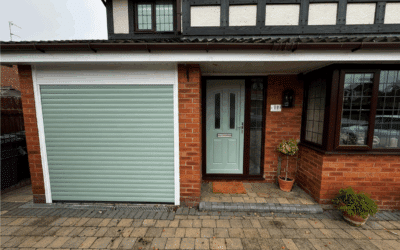
Spraying UPVC windows is one of the most effective ways to transform the appearance of your home without the disruption or cost of replacement. When done correctly, sprayed UPVC window frames can completely modernise a property while lasting for years.
In this guide, we explain our professional UPVC window spraying process, providing a clear, step-by-step walkthrough of how UPVC windows are sprayed. We also outline the approach homeowners would need to take if they were planning to carry out the work themselves.
Before you start – Is your setup suitable?
UPVC window spraying should only be attempted if you can work in a clean, dry environment with good ventilation. Contaminants like wind, dust, moisture, debris and the like, are all major causes of failure when spraying externally.
So to achieve the best results for UPVC window spraying, you will need:
- Dry weather with stable temperatures
- Enough space to move around the windows safely
- The ability to mask surrounding areas properly
- Time to complete the job without rushing.
If any of these are compromised, it’s likely the quality of your finish will suffer.
Equipment and materials you will need
| Cleaning and prep | Sanding and surface prep | Masking and protection | Spraying equipment | Paint and finishing |
| Buckets and clean cloths | 320 grit sanding pads or paper | High-quality masking tape | Paint sprayer suitable for solvent-based coatings | Professional-grade 2K UPVC paint |
| Mild soapy water | Red scotch bright pads | Masking film or plastic sheeting | Compressor capable of maintaining consistent pressure | Hardener and thinners as specified by the manufacturer |
| UPVC-safe degreaser | Dust mask and safety glasses | Drop sheets for surrounding areas | Correct spray tips and filters | Colour-matched silicone sealant |
| Silicone removal tools or knives | Respirator suitable for 2K paints | Cleaning solvents for equipment | ||
| Sealant remover if required | Protective gloves and coveralls |
Using incorrect or low-quality equipment is one of the main reasons DIY UPVC spraying fails.
Steps-by-step UPVC window spraying process
Step 1 – Cleaning the frames
Begin by washing all window frames thoroughly using soapy water. This will remove any visible dirt, moss, grime etc. that would interfere with paint adhesion.
Rinse well and allow the frames to dry fully before moving on.
Step 2 – Degreasing
Even clean-looking frames can carry invisible oils and residues. Wipe down all surfaces with a UPVC-safe degreaser using a clean flannel or cloth.
This step is essential. Skipping degreasing almost guarantees adhesions problems later.
Step 3 – Removing existing silicone
All silicone around your window frames will have to be removed. Paint will not adhere to silicone and any left behind will show through the finished coating.
Take care not to damage your frames or the surrounding surfaces during removal.
To remove the silicone, cut carefully along both edges of the silicone using a sharp knife or removal tool. Then peel it away slowly to avoid damaging the UPVC. Any residue should be softened with a silicone remover and wiped clean, followed again by degreasing to ensure no silicone film remains.
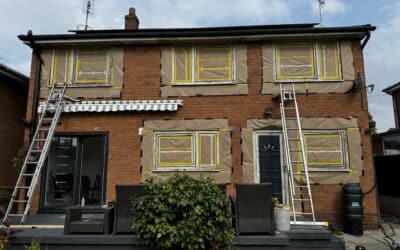
Step 4 – Masking the glass and surroundings
Mask the glass, rubber seals and surrounding brickwork carefully, using high-quality masking tape and protective film to fully isolate the frames. Take your time with this stage, as poor masking will lead to overspray and uneven edges that are very difficult to correct once the paint has cured.
Professional sprayers often spend as much time, if not more, masking and protecting surrounding areas than they actually do spraying, as clean lines are essential to the finished appearance.
Step 5 – Keying the UPVC surface
Lightly sand the frames using 320 grit abrasives and red scotch bright pads, working evenly across all surfaces including corners and detailed profiles. These materials are abrasive enough to dull the glossy UPVC and create a reliable key for the paint, but fine enough to avoid deep scratches that would show through the finished coating.
The aim is to dull the surface consistently rather than remove material, as over-sanding can damage the UPVC. This process creates a uniform bonding surface for the paint while preserving the shape and integrity of the window frames.
Step 6 – Removing dust
After sanding, remove all dust using compressed air or clean cloths. Any remaining dust will be visible in the final finish.
Work methodically and be sure to check corners and joints carefully, as dust can easily settle and hide in these areas.
Step 7 – Applying the paint
Apply three thin coats of 2K paint, allowing the correct flash-off time between coats as specified by the manufacturer.
Applying too much paint in one go can cause runs, sags or uneven texture. Many DIY attempts fail at this stage due to over-application or inconsistent spray technique.
Professional sprayers apply multiple controlled coats to build strength and depth, rather than relying on a single heavy coat.
Step 8 – Removing masking
Once the paint has cured, which typically takes between 24 to 48 hours depending on the temperature and specific 2K paint system used, you can proceed with the next step.
Cooler or poorly ventilated conditions may extend curing times, so it is important to follow the manufacturer’s guidance and avoid handling the frames too early.
Removing masking too early can smudge the finish, while leaving it too long can cause paint to lift at the edges, making timing and technique critical here.
Step 9 – Resealing the frames
Once fully cured, reseal the frames using colour-matched silicone. This restores weatherproofing and completes the visual finish.
Using white or mismatched silicone will undermine the final appearance.
Common DIY mistakes to avoid
- Spraying in windy or damp conditions
- Skipping degreasing or surface keying
- Using household paints not designed for UPVC
- Applying too few or too heavy coats
- Inadequate personal protection when using 2K products
2K paints contain hardeners that require proper respiratory protection. This is not an area where shortcuts should be taken.
Conclusion
While following the process above will provide a clear instructional for those who want to know how to spray UPVC windows, the best results relies on experience and controlled conditions. Knowing how paint behaves, how long to wait between each step and how to correct issues as they arise comes from years of hands-on work.
Sprayvue’s professional process is designed to deliver consistent, long-lasing finishes that most DIY setups struggle to replicate, particularly on complex window profiles and larger properties. So if you want high-quality UPVC window spraying results without the risk, reach out to our team today.
Frequently Asked Questions
Why are 2K paints used for UPVC window spraying?
2K paint is used because is chemically cures through a hardener rather than simply through air-drying. This creates a much stronger and more durable UPVC coating, as the paint bonds more effectively to surfaces and resists peeling, fading and weather exposure.
Can UPVC windows be sprayed without removing them?
Yes, UPVC windows can be sprayed in situ and without removal. This will require extensive masking and surface protection to control overspray and ensure clean edges. Removing windows is unnecessary for the most part and will lead to time delays and general home disruptions.
Is it safe to spray UPVC windows myself?
Spraying UPVC windows involves working with solvent-based coatings and 2K paint systems that require proper respiratory protection and controlled application. Without the correct equipment and experience, there could be minor health risks.
For more information on whether the fumes from UPVC spraying are toxic, have a read of our recent article here.

0 Comments